Get ready for Lumen® Enterprise Wireless Access Service
Enterprise Wireless Access Service (EWAS) complements the Lumen on‑net network footprint with extensive relationships with 4G LTE and 5G wireless access providers across North America providing a cost‑effective, ubiquitous non‑terrestrial primary or backup access option especially well suited for hard‑to‑reach locations.
Get ready for your service
| Step | Task | Lumen | You |
| 1 | Sign order: Your Lumen account representative will provide a service order form. Please sign this form and send it back to your Lumen sales team. | ||
| 2 | Order confirmation: Once the order is placed, you will receive an order confirmation email from Lumen. | ||
| 3 | Technical details: A Lumen sales engineer works with you to gather the necessary technical details for delivering your service. These details include the location for service installation (room suite), the contact information for the local contact who will be on site to receive equipment and service technician, and confirmation that you have space and power for the install. | ||
| 4 | Welcome email: A Lumen customer care manager will send you a welcome email. They will set a customer commit date, and coordinate order details and local contacts with the primary customer contact. The customer care manager guides you through the process of installing your service, ensuring that everything is set up correctly, and answering any questions you may have along the way. | ||
| 5 | Control Center: Sign in and familiarize yourself with Control Center. At any point until service activation, you can monitor your order status in Control Center. You can filter by product (Enterprise Wireless Access), order number, location, or service ID. | ||
| 6 | Installation coordination: Lumen (or Lumen agent) will contact you to coordinate an install date, and provide either an morning or afternoon window. | ||
| 7 | Equipment delivery: Equipment will be shipped directly to the service address 3–5 business days prior to the customer commit date. Please store the equipment in a safe space, at the service address, until install. | ||
| 8 | Location preparation: Prepare your location, ensure power and space is available, and confirm local contact to open the point of install is available. | ||
| 9 | Installation confirmation: An authorized agent of Lumen will contact you 1‑day prior to install to confirm installation details and inform you of the name and phone number of the technician who will come onsite to install your service. Please note that due to the network of installers used, the call is not always conducted. | ||
| 10 | Service installation: Lumen or authorized Lumen agent will come to your site, install equipment, confirm device internet connectivity, and capture device throughput results. |
| Step | Task | Lumen | You |
| 1 | Sign order: Your Lumen account representative will provide a service order form. Please sign this form and send it back to your Lumen sales team. | ||
| 2 | Order confirmation: Once the order is placed, you will receive an order confirmation email from Lumen. | ||
| 3 | Technical details: A Lumen sales engineer works with you to gather the necessary technical details for delivering your service. These details include the location for service installation (room suite), the contact information for the local contact who will be on site to receive equipment and service technician, and confirmation that you have space and power for the install. | ||
| 4 | Welcome email: A Lumen customer care manager will send you a welcome email and set a customer commit date. This date will be based on the later of the two dates:
| ||
| 5 | Control Center: Sign in and familiarize yourself with Control Center. At any point until service activation, you can monitor your order status in Control Center. You can filter by product (Enterprise Wireless Access), order number, location or service ID. | ||
| 6 | Equipment delivery: Equipment will be shipped directly to the service address 3–5 business days prior to the customer commit date. Please store the equipment in a safe space, at the service address, until install. | ||
| 7 | Install device: To install your wireless device, simply connect your EWAS device to a power source and the connected customer edge device. Wait for the device to boot up and connect to a carrier. Once the device is connected, you can start to use it. |
Best practices for EWAS device placement
The type of materials used in your home or office can affect signal strength. Metal and concrete walls will block the signal more than wood and drywall.
- Avoid placing the router in subterranean locations or inside a rack mount.
- Place the router near a window, if possible.
- If you are using an extended, external antenna, place it in a location towards the building exterior with a clear line of sight to the nearest cell tower.
Connect to your EWAS service
Lumen EWAS provides Internet connectivity to a customer‑provided edge device, such as an SD-WAN router. To receive the WAN connection from your EWAS service, connect using the following steps:
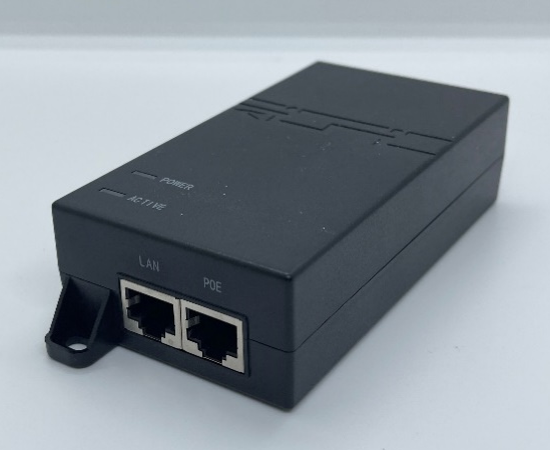
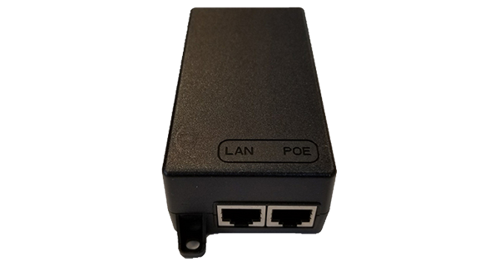
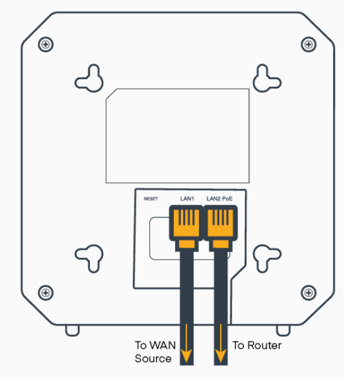
- Connect the equipment: Connect LAN port 1 of the Lumen-provided EWAS equipment to the WAN port of your equipment.
- Enable auto‑negotiation: Enable auto‑negotiation on the physical port of your equipment. This allows the equipment to automatically select the best speed and duplex mode.
- Enable DHCP client: Enable the DHCP (dynamic host configuration protocol) client on the logical port of your equipment. This allows your equipment to automatically obtain an IP address.
- Source NAT: Source NAT (network address translation) all traffic egressing the Lumen EWAS interface to the Lumen-assigned IP address (Lumen assigns 192.168.107.1 /24 by default). This allows your equipment to communicate with the internet. (For instructions on how to enable source NAT for your platform, please refer to your vendor’s documentation.)
- Firewall policy: If applicable, permit all outgoing and return traffic in the firewall policy. This helps ensure that your internet traffic is not blocked by the firewall.
Troubleshooting common problems
- If you're using EWAS with an InHand router, you must enable IPSec NAT traversal (NAT‑T) on both tunnel endpoints to establish an IPSec tunnel through source NAT.
- If you're using an SD‑WAN overlay device with the EWAS service, you must enable NAT traversal in your SD‑WAN appliances.
- Confirm cabling is installed correctly by unplugging the cable and checking that the correct LAN port is connected from the EWAS device to your device.
Additional EWAS resources
Setting up your EWAS equipment
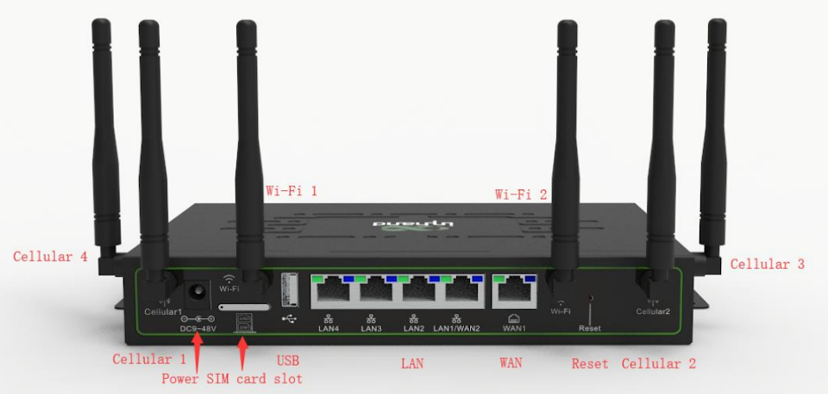
- Assembly and placement
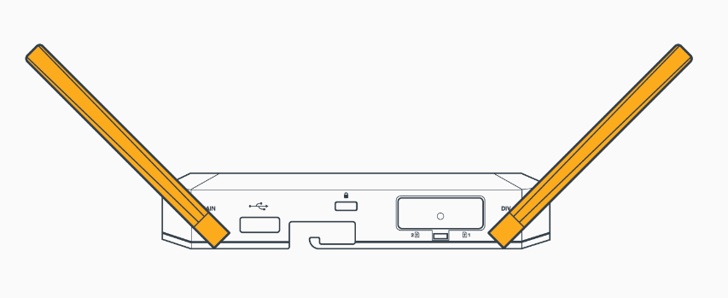
- Attach all four cellular antennas and ensure they are securely fastened.
- Place the device as high as possible in the room (on a shelf or wall mount) to minimize interference from other sources.
- Avoid placing the device near metal objects, windows, or other wireless devices.
- Attach all four cellular antennas and ensure they are securely fastened.
- Power on: connect the included power supply adapter and plug it into a 110V power outlet.
The device may take up to five minutes for initial network scan and connection.The connection LED turns solid when the device is connected to the network.
- Physically connect Lumen EWAS device to your edge device
- Connect LAN Port 1 of the Lumen‑provided EWAS equipment to the WAN port of your equipment (e.g., SD‑WAN router, switch, server).
- If you want to use the onboard WiFi for internet connectivity, you need to request it by creating a repair ticket (in Control Center).
- Connect LAN Port 1 of the Lumen‑provided EWAS equipment to the WAN port of your equipment (e.g., SD‑WAN router, switch, server).
- Configure customer edge device: your device/interface connecting to the Cradlepoint should be configured as follows:
- Enable auto‑negotiation on the physical port of your equipment.
- Enable DHCP client on the logical port of your equipment.
- Source NAT all traffic egressing the Lumen EWAS interface to the Lumen‑assigned public IP address.
- Permit all outgoing and return traffic in the firewall policy (if applicable).
- Enable auto‑negotiation on the physical port of your equipment.
Step 1: Prepare to install the router
- Unbox and inspect the ODU 5G router unit. Ensure it includes a 100' Ethernet cable and PoE injector.
- Ensure the room conditions meet the requirements for working temperature (‑30–70°C) and storage temperature (‑40–85°C).
- Select a location to mount the device. Avoid heat sources or strong electromagnetic interference. Make sure the installation position can support the weight of the equipment and its accessories.
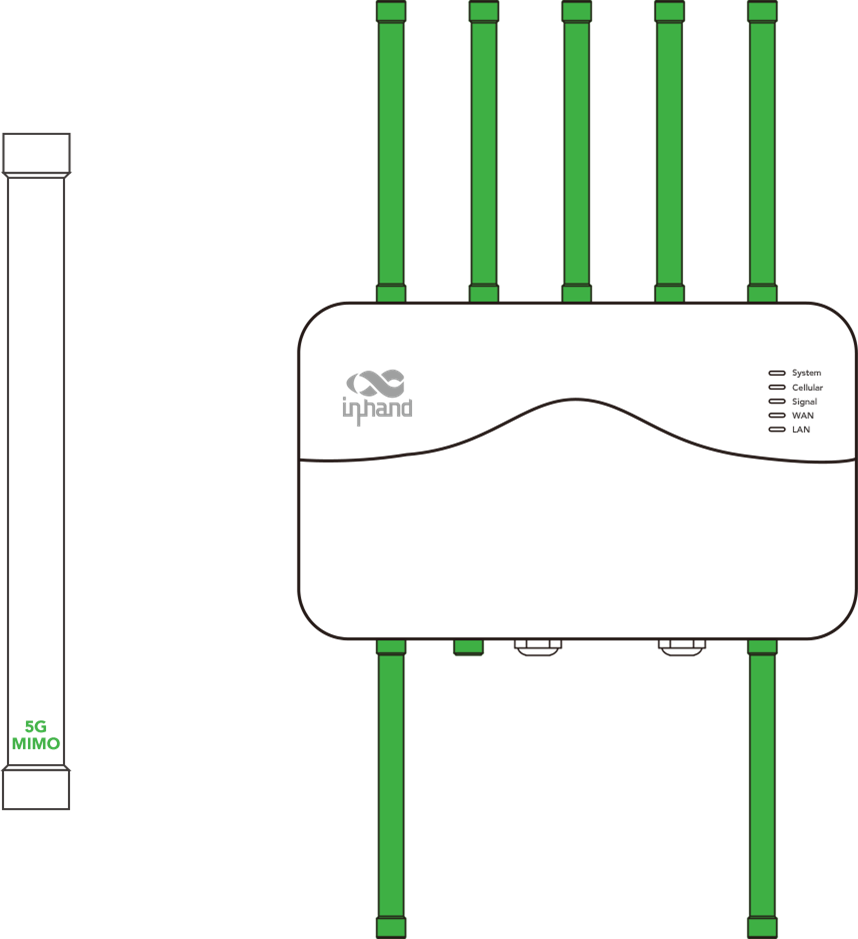
Step 2: Attach the antennas
Attach the eight antennas to the TNC connectors marked 5G/5G MIMO/Wi‑Fi and GNSS.
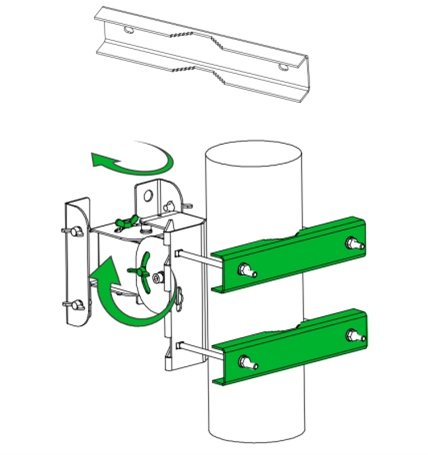
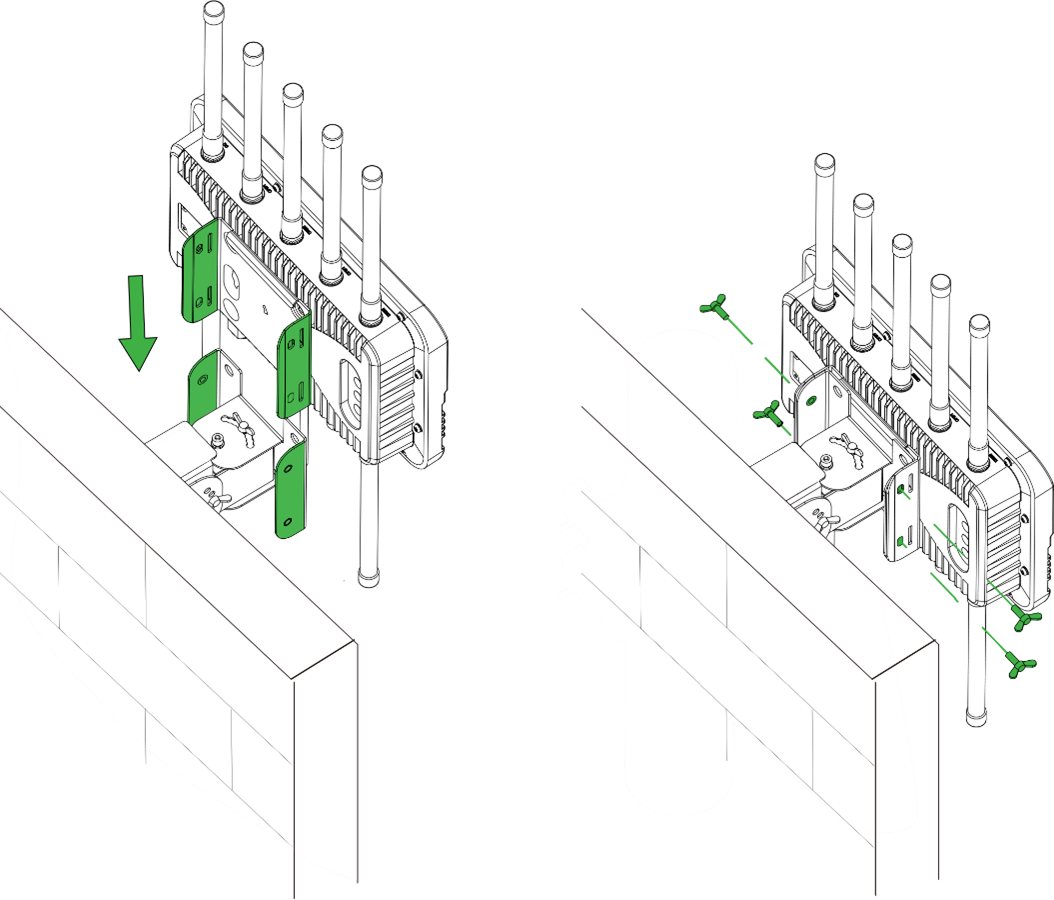
Step 3: Mount the router
Mount the router as high as possible. Its location significantly affects performance. If external access is not available and the device is installed inside, place it near a window or on an external wall as high as possible. Note that external access must be existing or provided by you; Lumen does not bore holes in the building exterior as part of the on‑site installation. Do not place the ODU on a shelf or in a rack; you must mount it on a wall or pole.
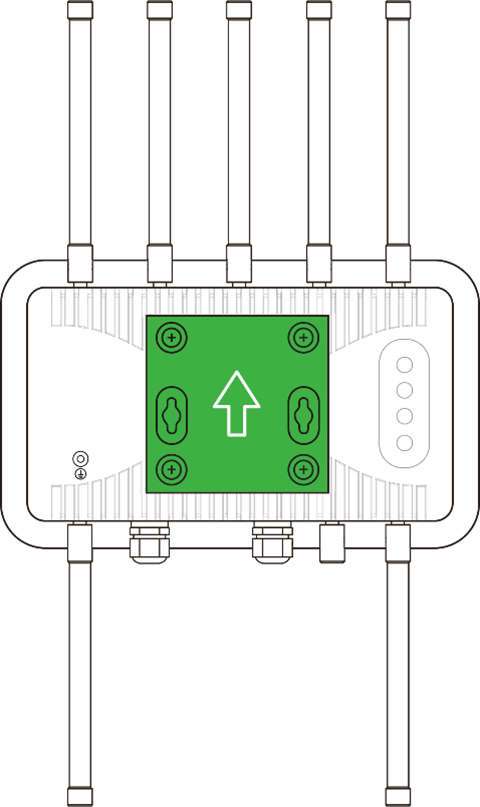
- Attach the mounting plate to the ODU2002 using screws. Ensure the top side is facing upwards.
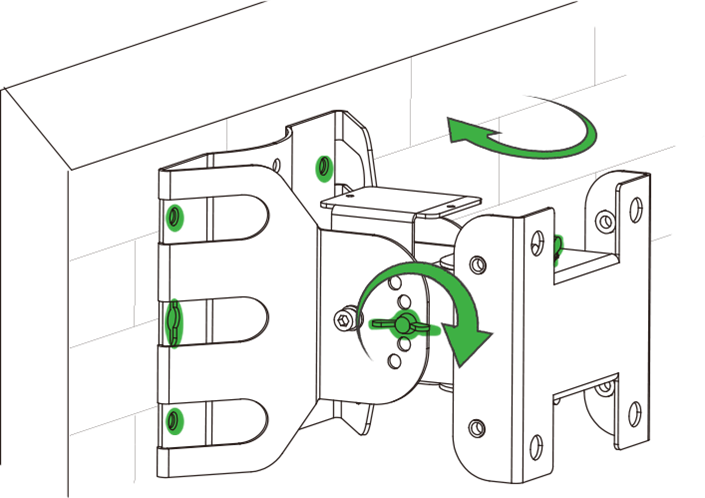
- Select whether you're mounting to a wall or pole:
- To mount on a wall:
- Install the adjustable base on the wall at the desired angle and position.
- Attach the mounted ODU2002 to the base.
- Tighten the mounting bolts to lock the ODU2002 in place.
- Install the adjustable base on the wall at the desired angle and position.
- To mount on a pole:
- Install the adjustable base on the pole at the desired angle and position.
- Attach the mounted ODU2002 to the base.
- Tighten the mounting bolts to lock the ODU2002 in place.
- Install the adjustable base on the pole at the desired angle and position.
- To mount on a wall:
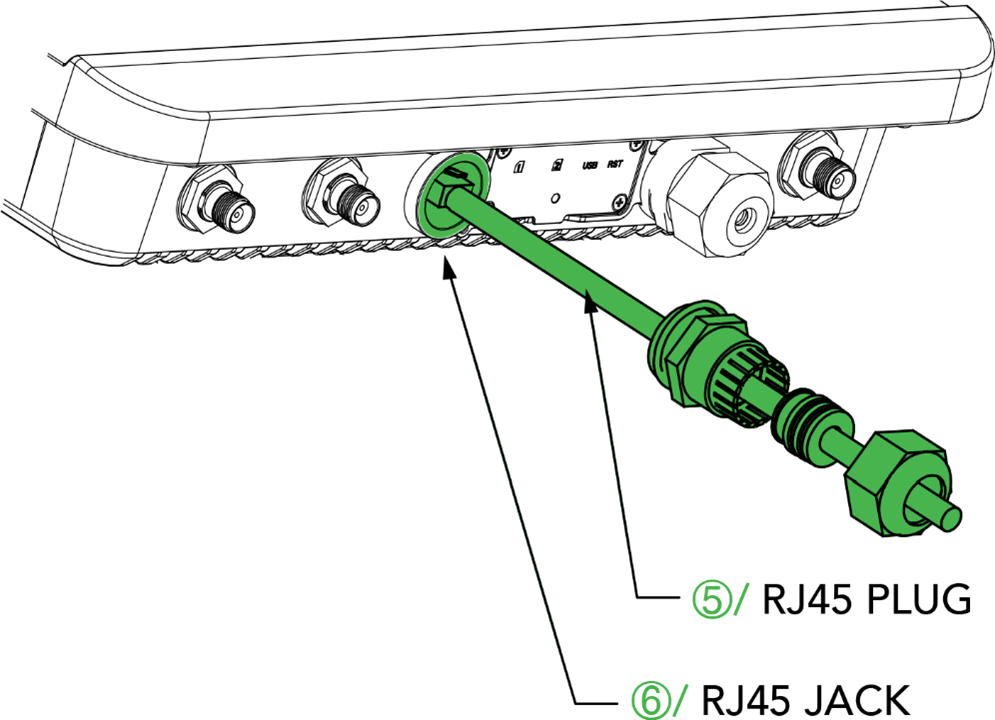
Step 4: Connect the Ethernet cable
- Ensure the Ethernet cable is inserted into the device correctly. Incorrect insertion may damage the crystal head when installing the waterproof PG head. (When removing the Ethernet cable, remove the waterproof PG head first, then the crystal head connected to the device.)
- Confirm the diameter of the Ethernet cable is between 4.8–6.5 mm.
- Ensure the cable glands are properly assembled to prevent leaks.
- Provide an Ethernet cable that is appropriate length according to the distance from the ODU to the power supply (up to 300') and pass it through the bracket.

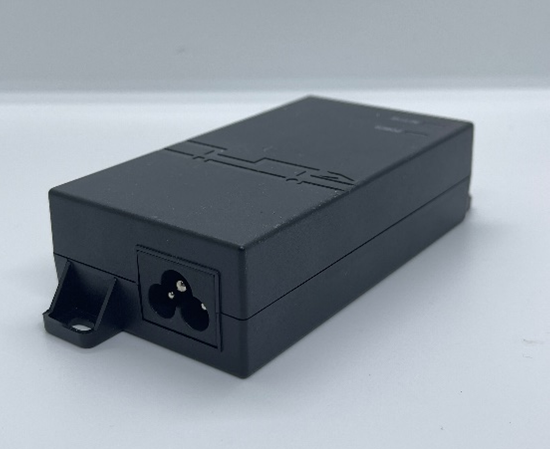
Step 5: Provide power for the router
- To power your device using the PoE power adapter:
- Connect the PoE adapter to an 110V AC power source.
- Connect one end of the Ethernet cable to the PoE 2.5G LAN1 port on the EWAS router and plug the other end into the PoE port of the Lumen provided PoE adapter.
- Connect the LAN port of the PoE adapter to the WAN port of the customer provided equipment with a standard Ethernet cable.
- Enable auto‑negotiation on the physical port of the customer‑provided equipment.
- Enable the DHCP client on the logical port of the customer‑provided equipment.
- Source NAT all traffic egressing the Lumen EWAS interface to the Lumen‑assigned public IP.
- If applicable, permit all outgoing and return traffic in the firewall policy.
- Connect the PoE adapter to an 110V AC power source.
- To power your device using a PoE-enabled WAN port:
- If applicable, permit all outgoing and return traffic in the firewall policy.
- Source NAT all traffic egressing the Lumen EWAS interface to the Lumen‑assigned public IP.
- Enable the DHCP client on the logical port of the customer‑provided equipment.
- Enable auto‑negotiation on the physical port of the customer‑provided equipment.
- Connect LAN1 port of the Lumen‑provided EWAS equipment to the WAN port (PoE enabled) of the customer‑provided equipment (e.g., SD‑WAN router, switch, server).
- Ensure that PoE capabilities of your device provide up to 15.4 W of DC power on the 802.3at PoE standard.
- If applicable, permit all outgoing and return traffic in the firewall policy.
- Attach the included dual paddle antennas to the "MAIN" and "DIV" mini‑coax jacks on the L950. Do not over‑tighten. (Note: Before shipment, the SIM will already be inserted and activated in the Cradlepoint modem.)
- Choose a connection option between the Lumen EWAS devide and your edge device:
- Option #1 (recommended):
- If your device connecting to the Cradlepoint supplies PoE, you MUST connect the Cradlepoints LAN2 port to that sub‑tended router/switch and MUST NOT connect the external POE injector power "brick" to the Cradlepoint.
- Connect the L950 LAN2 PoE port to the designated Ethernet port on the Lumen‑managed router or switch with a standard Ethernet cable. The port on the router or switch must be configured for auto‑negotiation.
- If your device connecting to the Cradlepoint supplies PoE, you MUST connect the Cradlepoints LAN2 port to that sub‑tended router/switch and MUST NOT connect the external POE injector power "brick" to the Cradlepoint.
- Option #2:
- If the device connecting to the Cradlepoint does not supply PoE, you must connect a PoE injector in line between the Lumen‑provided L950 and your device.
- Plug the Ethernet cable connected to LAN2 PoE on the L950 to the OUT port on the power injector.
- Plug a second Ethernet cable into the IN port on the injector and connect the other end of this cable to the port on the Lumen‑managed device.
- Plug the PoE injector into a standard AC power outlet or into a UPS.
- If the device connecting to the Cradlepoint does not supply PoE, you must connect a PoE injector in line between the Lumen‑provided L950 and your device.
- Option #1 (recommended):
- Connect your equipment to the Cradlepoint as follows:
- Speed/duplex: Auto.
- IP address: DHCP‑enabled (Cradlepoint serves the LTE provider's public IP address with a /24 mask).
- Default route: To .1 in the /24 subnet provided.
- If EWAS is the only form of WAN connectivity on your device, the DHCP client should install the correct default route automatically. If there are additional forms of WAN connectivity on your device, you may need to adjust default route metrics and/or ignore the DHCP‑served default route to achieve the desired WAN routing behavior.
- Speed/duplex: Auto.
- Once connected to power, the L950 begins the boot up process. This generally takes five minutes with an additional five minutes to connect to the cellular carrier and the NetCloud Manager.
Once this step completes, you will see a solid white light on top of the L950. Your EWAS service is now operational.


