Porting a phone number to Local Inbound
After you check whether you can port phone numbers to a Lumen® Local Inbound service, use Lumen Connect to create an order to port those phone numbers from another carrier to Lumen. Once your port order is ready, you can also trigger the port in Lumen Connect.
Need more phone numbers? You can also reserve phone numbers for Local Inbound service.
Note: If you need to port 600 or fewer phone numbers (even from multiple carriers), submit the order using the lead phone number for each group of phone numbers as the billing telephone number (BTN). Our automated systems will create a single voice order ID (VOID) and will determine the carrier involved for each group of numbers, generating a parent order number (PON) for each BTN group to process the port request. Each PON will receive a firm order confirmation (FOC) from the donor carrier to port their numbers, coordinated under the VOID and requested port date.
Need to port 601–10,000 phone numbers? Submit an LNP project ticket
Use these guidelines to understand the port-in SLA intervals. This guide is to clarify the port-in SLA intervals so that customers don’t need to open tickets to our LNP Help Desk team unless the LNP Status Report shows the port-in order in CSR exceeded or LSR exceeded status.
Here are the average SLAs (service level agreements) for each donor carrier so that you have a good porting estimate to give your customer. These porting intervals are based on submitting a clean order and don't included extended timeframes to correct rejections.
E-bonded carriers: (Qwest, BellSouth, SBC/AT&T, Verizon, Ameritech, Frontier, SWBell, Bandwidth, Level 3 Sonus) | The SLAs are pretty quick because of automation, though of course any reject would cause the order to fall out of automation and be processed manually as with any other manual-based carrier. CSR phase: 5 minutes LSR phase: 1–24 hrs Pending Activation phase: 3 business days Total port time: 3–4 business days |
Manual-based carriers: For the other 200+ carriers we port from daily, the intervals are a little longer. This includes porting phone numbers into the legacy Level 3 from our Lumen-acquired company networks (Broadwing/Focal, ICG, Adelphia/Telcove, Global Crossing, TW Telecom, CenturyLink/Embarq) because we have to use that mechanism to update and synchronize all the systems rather than our internal port process where the phone numbers are already on the Level 3 Sonus network. | CSR phase: 2 business days or less (up to 5 business days for a few carriers) LSR phase: 2 business days or less (up to 5 business days for a few carriers) Pending Activation phase: 3 business days Total port time: 4–8 business days
|
Internal ports: Porting phone numbers from one customer/local service provider to another on our Sonus network. | CSR phase: 60 seconds (requested by you in Lumen Connect) LSR phase: 1 hour to 1 business day Pending Activation phase: 2 business days Total port time: 3 business days |
Acquired company networks: Porting port phone numbers to our Sonus network from our Lumen-acquired company networks (Broadwing/Focal, ICG, Adelphia/Telcove, Global Crossing, TW Telecom), until we are fully integrated we have to use the manual-based carrier port-in mechanism to update and synchronize all the systems rather than our internal port process. | CSR phase: 2 business days LSR phase: 2 business days Pending Activation phase: 3 business days Total port time: 4–8 business days |
Migration project ports: Porting in large or complex orders not available using the portal, the interval varies due to quantity. | 50–750 phone numbers: 15 business days 750–10,000 phone numbers: 20 business days For an internal project on our Sonus network of ≥1,000 phone numbers: 10 business days If you have over 10,000 phone numbers, we may need to divide the project into two days as we have an activation limit of 10,000 phone numbers per day per customer. |
Simple ports: Porting in single, residential phone numbers with no features. | AM submittal: If you submit the port order before 1:00 pm (local time of the phone number), the same day is considered day zero. The CRD and FOC will be scheduled for the next business day. PM submittal: If you submit the port order after 1:00 pm (local time zone of the phone number), day zero is pushed to next morning and gets a CRD and FOC for the following business day. Total port time: 24 hours Note: Manual intervention required. After submitting the port order, you must contact our LNP Help Desk to request 1-day ports after validating that the phone number qualifies as a simple port. |
Mobile/cell ports: Porting in a single, residential or business phone number. | AM submittal: If you submit the port order before 1:00 pm (local time of the phone number), the same day is considered day zero. The CRD and FOC will be scheduled for the next business day. PM submittal: If you submit the port order after 1:00 pm (local time zone of the phone number), day zero is pushed to next morning and gets a CRD and FOC for the following business day. Total port time: 48 hours Note: Bulk order form and submittal required with Social Security number or PIN/password. |
To port a phone number to Local Inbound:
- Using the left menu, click Services, click Service Tools, then click ELS & LI Management.
- If you have more than one customer number on your enterprise ID, select the customer number you want to work with, then click PROCEED.
- Click the Install Order tab.

- Fill in the Order Infomation section:
- If you want to add an internal tracking number, type it in the Customer Internal Order ID field.
- If you want to add a version number to the order, type it in the Version field.
- From the TN Type list, LNP.
- From the Product list, select LI.
- Click LETTER OF AUTHORIZATION, then do the following:
- From the Document Type list, select Letter of Authorization.
- Click Choose File, browse to locate the file containing the letter of authorization (LOA), then click Open. (To download a copy of the LOA template, click Download Template.)
- If the letter of authorization contains an invoice, select the LOA contains Invoice checkbox.
- Click Upload.
Lumen Connect attaches the document to the order.
- If you need to attach a copy of an invoice or the customer service record (e.g., if the donor carrier's records don't match the letter of authorization), repeat steps i–iv to attach the additional documents.
- From the Document Type list, select Letter of Authorization.
- In the Porting Authorization Name field, type the name of the person authorizing you to port the phone number(s) to Lumen.
- Use the Authorization Date field to select the date the person authorized the port. (The date on your LOA must be between yesterday's date and six months ago. Lumen rejects orders containing LOAs dated outside this range.)
- Click CONTINUE.
- If you want to add an internal tracking number, type it in the Customer Internal Order ID field.
- Click the icon next to the TN Number field.
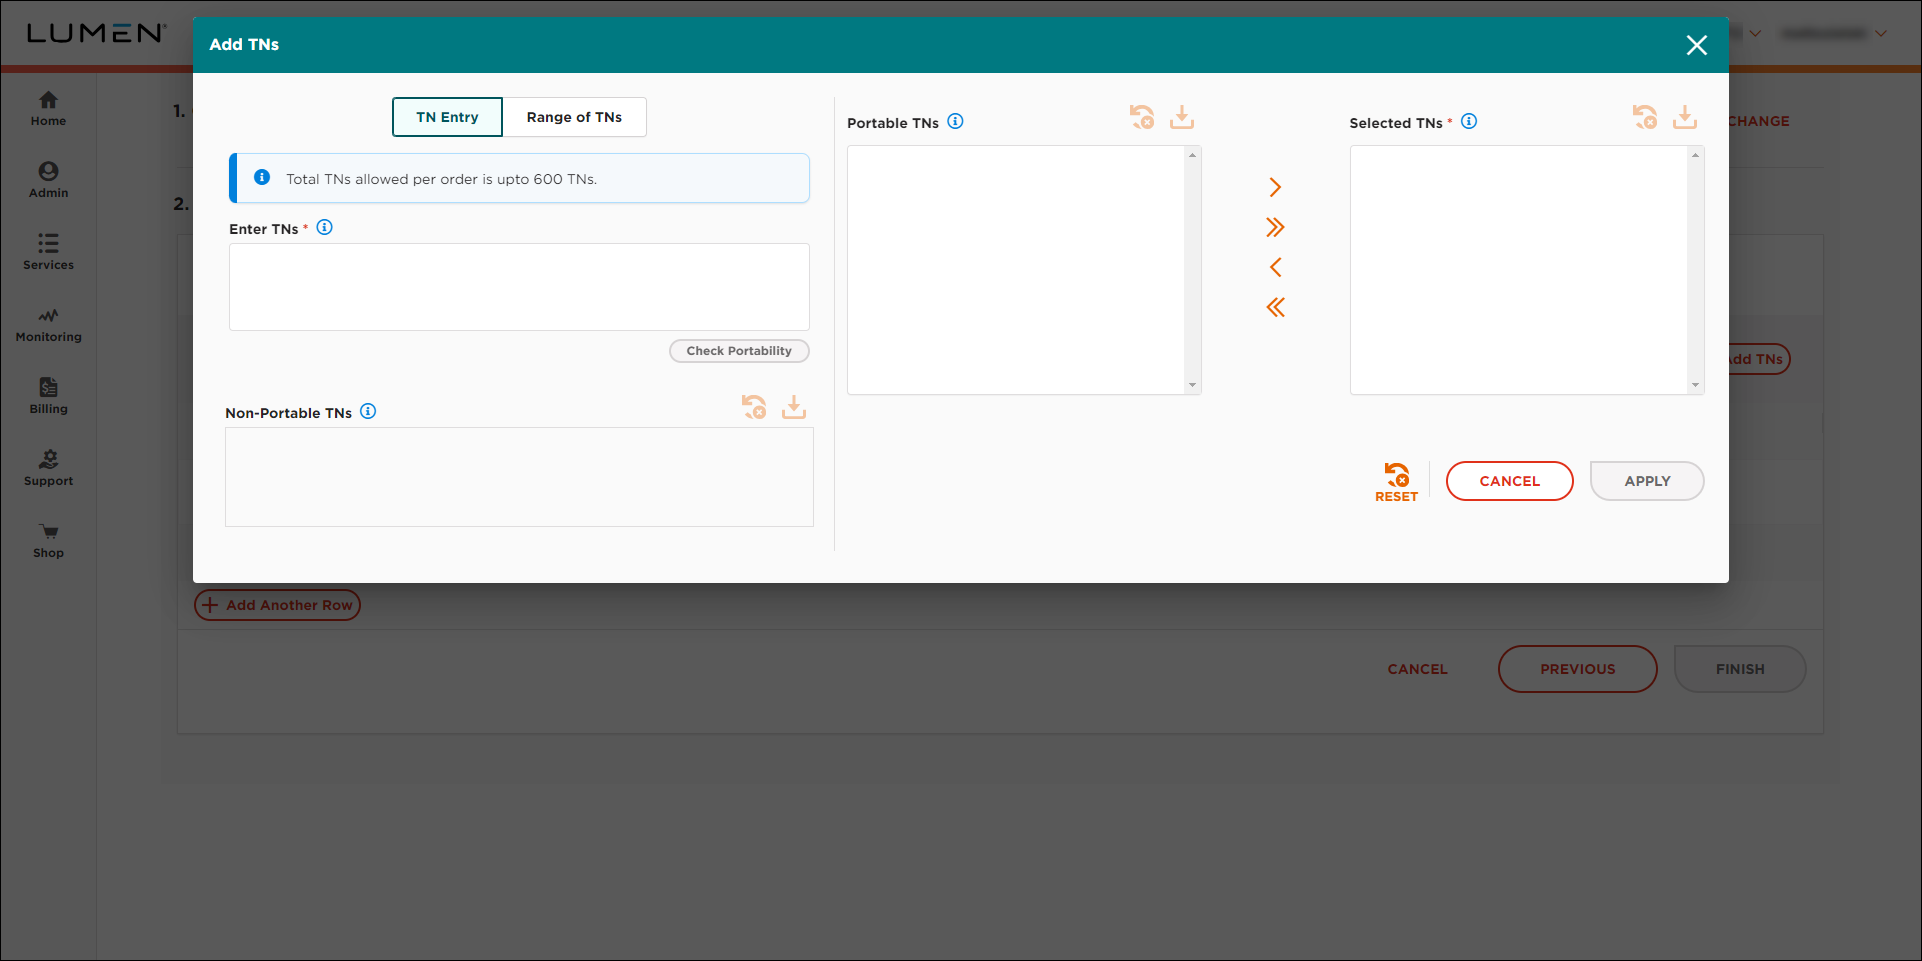
- Use the fields on the left to check the portability of the phone number(s) you want to add to the order:
- To check portability for single phone numbers, do the following:
- Click TN Entry.
- In the Enter TNs field, type the phone number(s) with no spaces, hyphens, or parentheses (e.g., 3035551212). (If you're checking more than one phone number, type only one number per line.)
- Click Check Portability.
Lumen Connect checks the phone number(s) you typed. If you can port a phone number, Lumen Connect lists it in the Portable TNs field. If you cannot port a phone number, Lumen Connect lists it in the Non‑Portable TNs field.
- To port all listed phone numbers, click the icon to move the phone numbers to the Selected TNs field. Otherwise, select the phone number(s) you want to use, then click the icon to move the phone numbers to the Selected TNs field.
- When you're done, click APPLY.
- Click TN Entry.
- To check portability for a range of phone numbers, do the following:
- Click Range of TNs.
- Use the From and To fields to specify the range of phone numbers you want to check.
- To see all available phone numbers in the rate center, select the Show all available TNs in Rate Center checkbox. Otherwise, type the number of phone numbers you want to use from the rate center. If you need sequential number, select the Sequential Only checkbox.
- Click Check Portability.
Lumen Connect checks the range of phone number(s) you typed. If you can port the phone numbers, Lumen Connect lists the range in the Portable TNs field. If you cannot port the range of phone numbers, Lumen Connect lists the range in the Non‑Portable TNs field.
- To port all listed phone numbers, click the icon to move the phone numbers to the Selected TNs field. Otherwise, select the phone number(s) you want to use, then click the icon to move the phone numbers to the Selected TNs field.
- When you're done, click APPLY.
- Click Range of TNs.
- To check portability for single phone numbers, do the following:
- From the Customer Service Name list, select the trunk group you want the assign the phone number(s) to.
- From the CTI list, select whether the phone number(s) is for residential or business use.
- From the Additional Details list, select Customer Information.
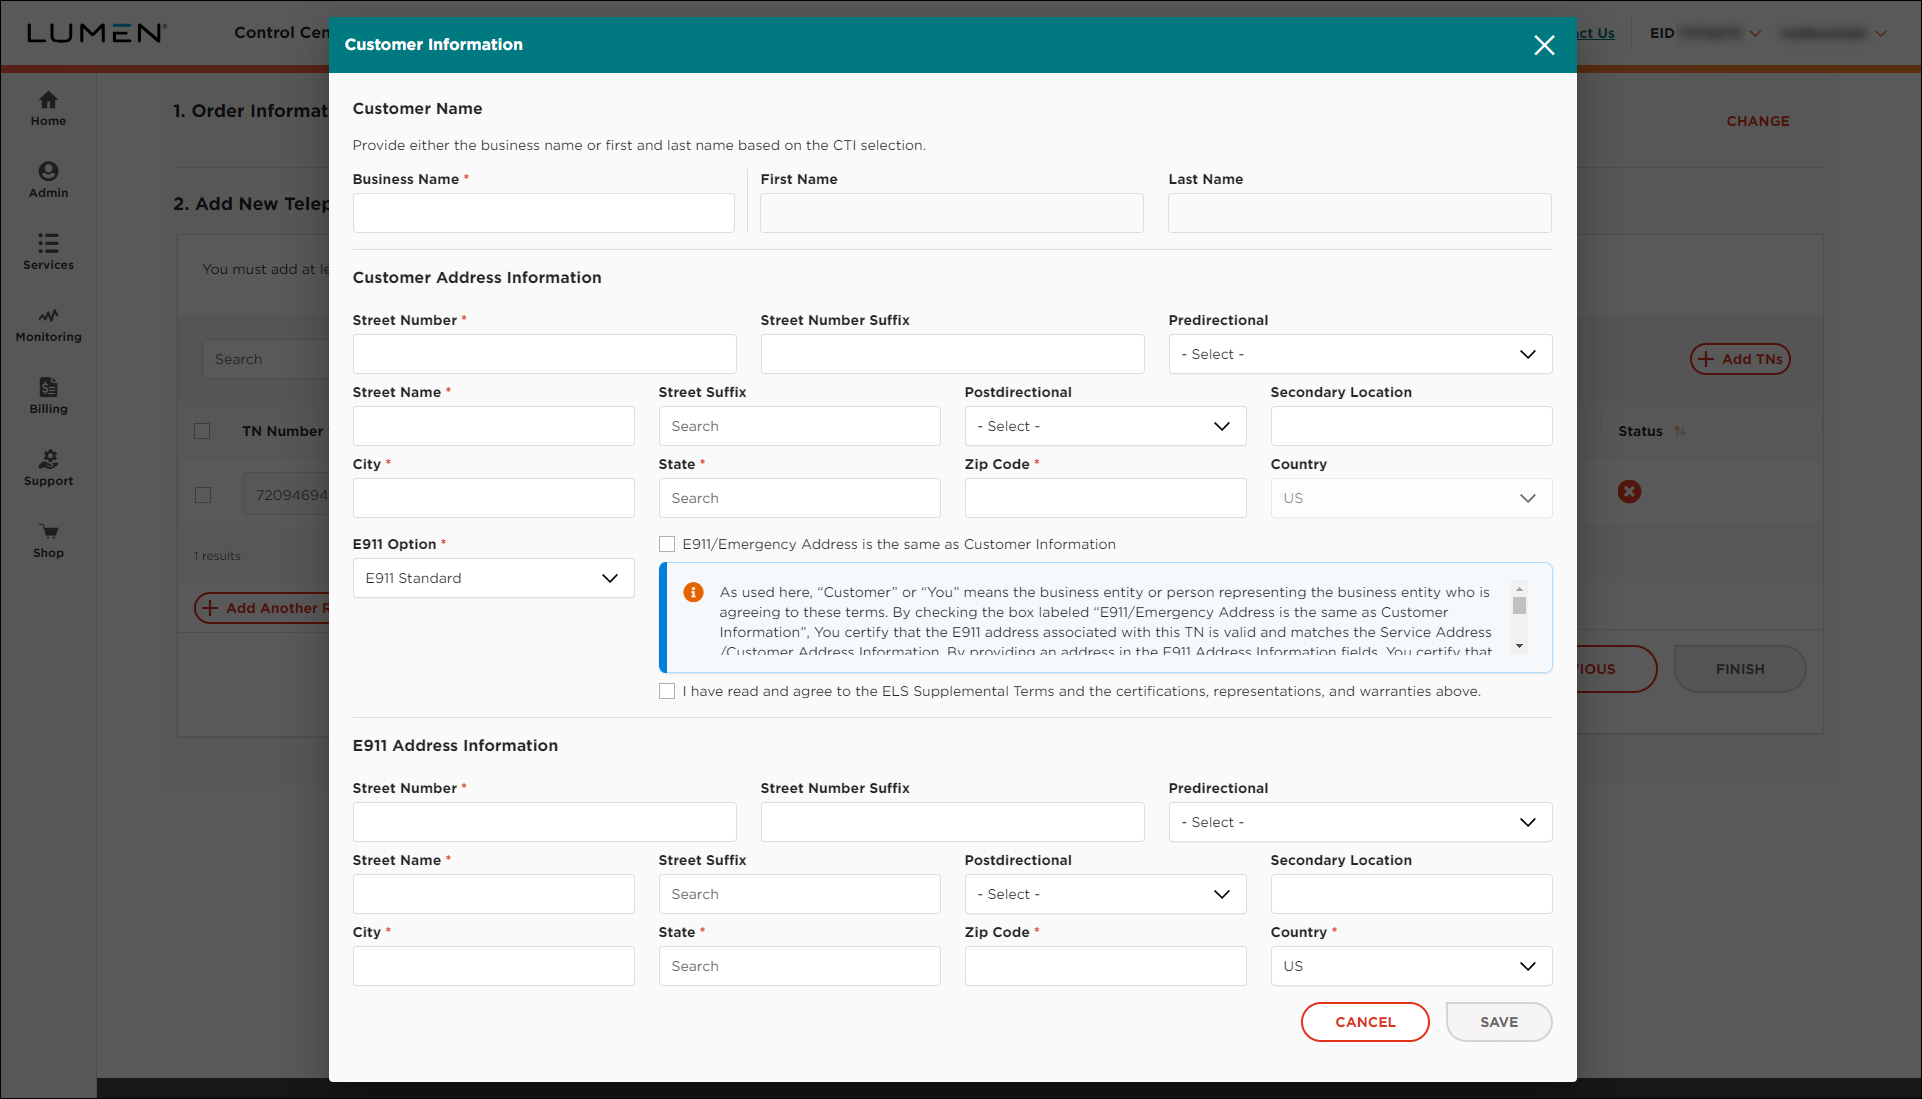
- In the Customer Name section, do one of the following:
- If the phone number(s) is for residential use, type the first and last name for the customer.
- If the phone number(s) is for business use, type the name of the business.
- If the phone number(s) is for residential use, type the first and last name for the customer.
- In the Customer Address Information field, use the fields to fill in the customer address for the phone number(s).
- In the E911 Options field, select either E911 Static or E911 Customer Provided.
- Click SAVE.
- From the Additional Details list, select CNAM & Directory Listing.

- Fill in the calling name and directory listing information (if any) for the phone number(s):
- To provide a calling name for the phone number(s), clear the Block CNAM checkbox and type the calling name in the CNAM Value field. (Otherwise, leave the Block CNAM checkbox selected.)
- To provide a directory listing for the phone number(s), do the following. (Otherwise, leave Decline selected in the Directory Listing Action field and continue with the next step.)
- From the Directory Listing Action list, select Add.
Lumen Connect pulls the information you typed in the Customer Information window to help you get started with the directory listing.
- From the Directory Listing Add Type list, select whether you want the directory list published in Directory Assistance (DA)/411 only or also in available publications.
- From the Address Listed? list, select whether you want to include the address in the directory listing.
- Review the name and address information shown and make any changes to the name and address.
- From the Directory Listing Action list, select Add.
- When you're done, click SAVE.
- To provide a calling name for the phone number(s), clear the Block CNAM checkbox and type the calling name in the CNAM Value field. (Otherwise, leave the Block CNAM checkbox selected.)
If you leave the CNAM field blank or don't want a caller name listed, the default caller name is City, State. To specify the caller name, type a name (up to 15 characters). You cannot use any of the following:
- special characters—except “&” !@#$%^&*()
- telephone numbers (10‑digit 123‑456‑7890, 1234567890)
- anonymous
- blank
- NA or N/A
- none
- private
- TEST
- unknown
- unlisted (etc.)
- any name including (Non Pub)Business Name
- From the Additional Details list, select Losing Carrier & Subscriber.
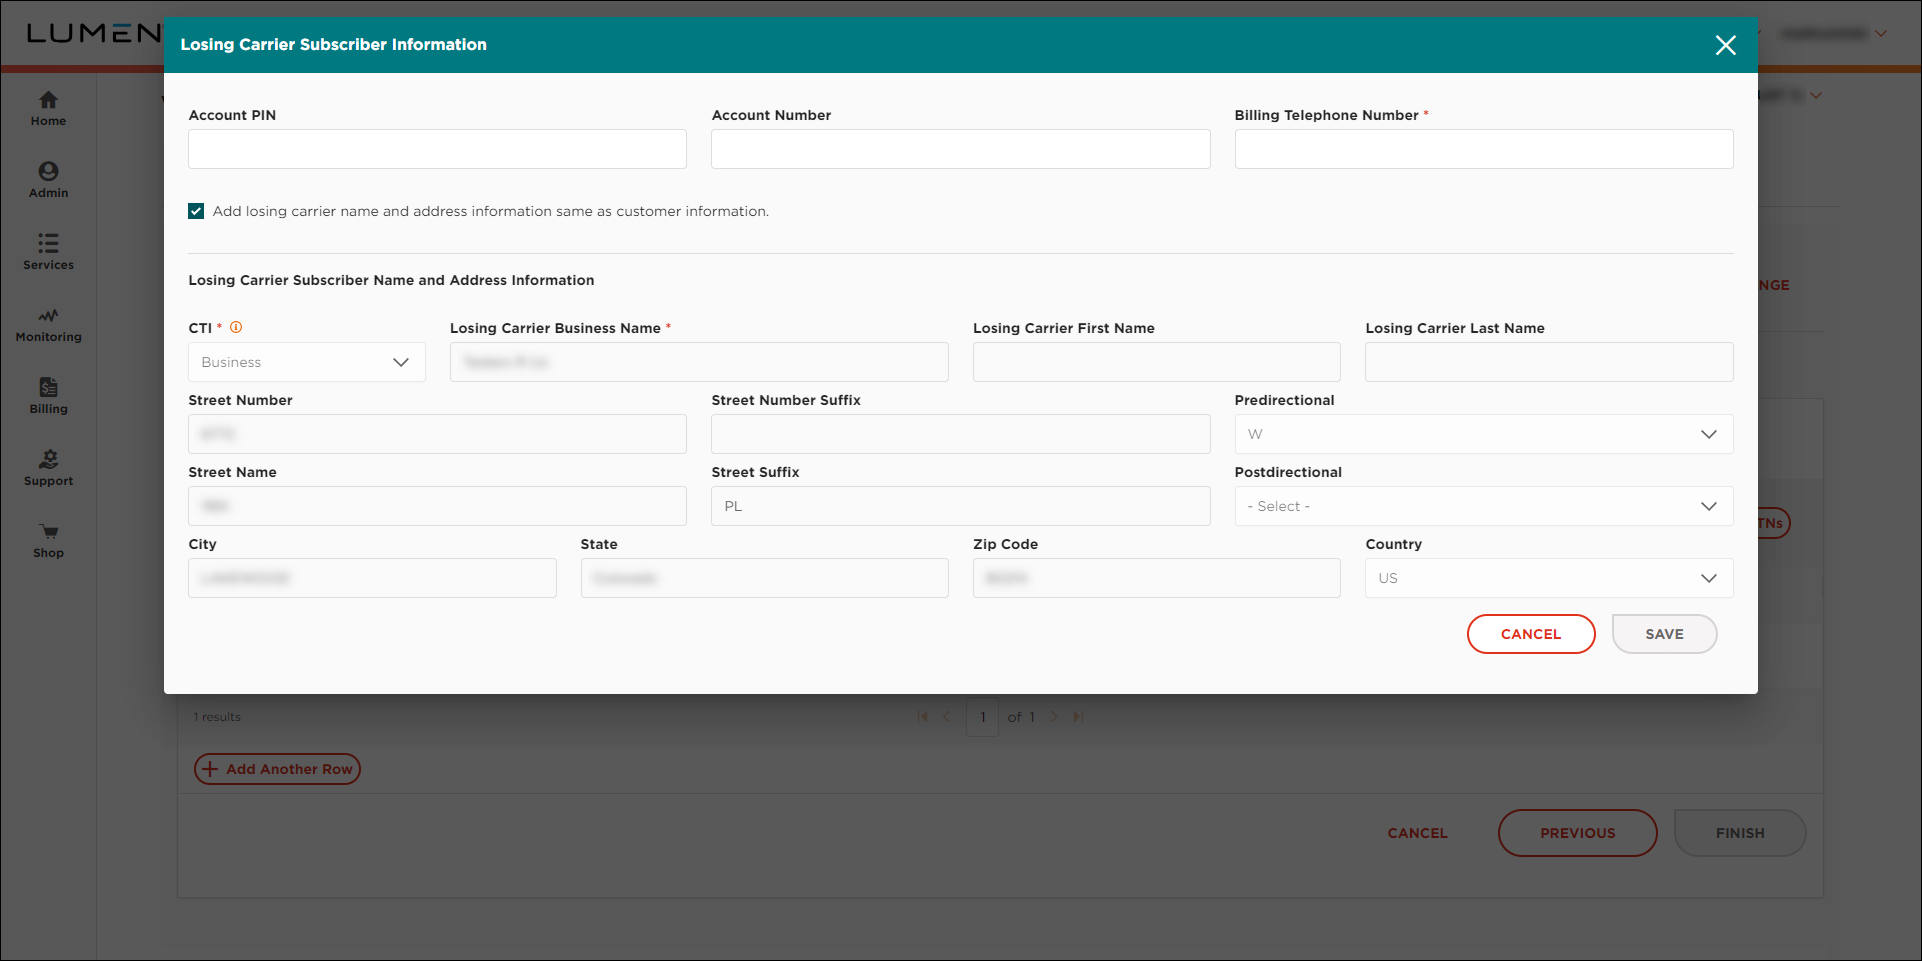
- Fill in the losing carrier subscriber information for the phone number(s):
- Type the account PIN and account number (if available)
- Type the billing telephone number.
- If the subscriber name and address match the information you provided in the Customer Information window, leave the Add losing carrier name and address information same as customer information checkbox selected. (Otherwise, clear the checkbox and add the subscriber's name and address.)
- Click SAVE.
If you've completed all the fields for the phone number(s), Lumen Connect changes the icon to a icon.
- Type the account PIN and account number (if available)
- To add a line to the order so you can port an additional phone number(s), click Add Another Row, then repeat steps 6–18. (Otherwise, continue with step 20.)
- Click FINISH.
- In the window that appears, do the following:
- Select the requested due date.
- If necessary, clear the Autoport checkbox and select a time to port the phone number(s). Otherwise, leave the Autoport checkbox selected. (We recommend a time 2:00 am–9:00 pm MT.)
- Add any comments to the order to help Lumen process your request.
- When you're done, click FINISH.
Lumen Connect places your order and shows the status of your order as Created. You can now track the status of your order in Lumen Connect.
- Select the requested due date.


