Using the Switched batch formatter
Creating Switched batch file using a template and web-based Switched batch formatter tool.
To use the Switched batch formatter:
- Using the left menu, click Orders, click Manage Orders, then click Batch.
- In the Ordering Type field, select the Switched radio button.
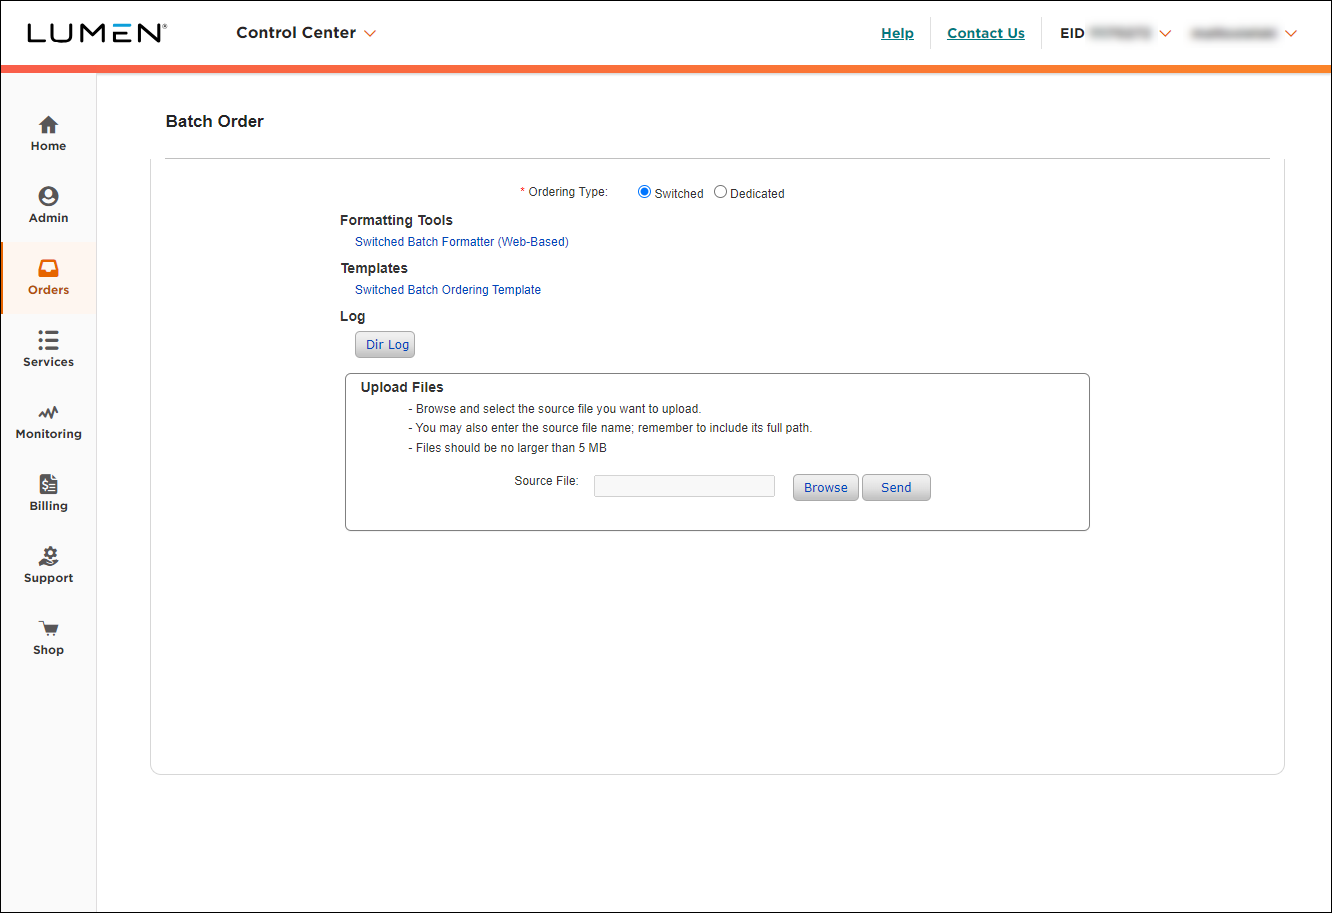
- Click Switched Batch Formatter (Web Based).
You can enter data directly into the tool using the Add Row button. Hovering over each field will reveal a popup message to provide formatting information.
- Switched Batch required fields provides the minimum required fields information for each type of order (action of add/change/disconnect/block/unblock for ANI, Switched 8XX and calling card)
- Switched Batch file format provides details regarding file naming, header/data/trailer records and data dictionary for detailed examples of each batch field
- You can use the buttons across the top of the Switched Batch Formatter to add and delete rows, load files, validate, and save orders.
- Load File: the Switched Batch Ordering Template can be used in a spreadsheet program such as Microsoft Excel, then uploaded to the Web‑Based Switched Batch Formatter Tool using the Load File button.
Note:
- Download template at location Manage Orders > Batch, select Ordering Type as "Switched”
- The Formatter Tool, Template, DIR.LOG and Upload Files interface are all located on this screen.
- To download the template, click Switched Batch Ordering Template (in the Templates section).
- Enter your data, then click Validate.
Control Center opens a new tab or window and lists errors you need to fix, such as formatting issues or mandatory fields. Each time you click Validate, Control Center opens a new tab or window with a date/time stamp. If you keep the validation tabs/windows open while you're fixing the data, use the date/time stamp to find the most recent validation.
- Click Save to save the file.
Note: The Switched Batch Formatter Tool supports approximately 1,000 rows of data, when entering data directly into the web browser.
Larger files of up to approximately 10,000 rows of data can be created, using a smaller file that has already been validated by the Switched Batch Formatter.
- To upload the file, do the following:
- In Control Center, go to Manage Orders, Batch, select Ordering Type as Switched.
- In the Upload Files section, click Browse, locate your saved file, then click Open.
- Click Send.
You should now get a response from Control Center that your file has successfully been loaded.
- In Control Center, go to Manage Orders, Batch, select Ordering Type as Switched.
- Check to determine if your file was processed or was a bad file:
- Determine if your file was processed or if it was rejected as a bad file.
- Using the left menu, click Orders, click Order Status, then click Preliminary Order Status.
- Search for file name (case sensitive) or search for Ordering Method as Switched Batch.
- Using the left menu, click Orders, click Order Status, then click Preliminary Order Status.
- Click on the link under the Parent Order ID column and an overlay will display with two tabs: Order Details and Files.
Files will display:
- Upload – the file will initially sit here waiting to be picked up for processing.
- Archive – the file is moved here when it is successfully picked up for processing.
- Bad Files – the file is moved here when it is rejected, see DIR.LOG in Upload for more information.
- Results – 4 results files are generated, open the .WHL file using Notepad.
- Reviewing a successful processed order:
- Your order will list all the services submitted, and identify if the service was accepted or rejected.
- If the individual service rejected the report will give you an explanation of why it rejected.
- At the bottom of the file it also identifies total records processed, total records accepted, total records rejected.
- Reviewing your bad files:
- See DIR.LOG in Upload for more information
- Some common issues resulting in rejected file:
- The Batch ID on the header line was not changed from generic to the customer code.
- There was an extra line at the bottom of the file.
- Determine if your file was processed or if it was rejected as a bad file.
Explore Control Center


